
PHP-ETL - Getting Started
🛠️ EasyAdmin Interface
The EasyAdmin bundle
If you use EasyAdmin with your Symfony project, this bundle gives you a full admin interface to monitor and execute ETL processes: a dashboard, an execution list/detail view with logs and downloadable output files, and (see below) a real-time execution graph.
Install
Start by installing the Symfony bundle
- Start by installing the necessary dependencies
composer require oliverde8/php-etl-bundle -
in
/config/create a directoryetl - Enable bundle:
\Oliverde8\PhpEtlBundle\Oliverde8PhpEtlBundle::class => ['all' => true], - Optional You can enable queue’s if you have an interface allowing users to execute etl processes (Easy Admin for example).
framework: messenger: routing: "Oliverde8\PhpEtlBundle\Message\EtlExecutionMessage": async - Optional: Enable creation of individual files for each log by editing the monolog.yaml
etl:
  type: service
  id: Oliverde8\PhpEtlBundle\Services\ChainExecutionLogger
  level: debug
  channels: ["!event"]
Now install the EasyAdmin bundle
- Install the necessary dependencies
composer require oliverde8/php-etl-easyadmin-bundle
- Enable the bundle
\Oliverde8\PhpEtlBundle\Oliverde8PhpEtlEasyAdminBundle::class => ['all' => true],
- Add to easy admin
yield MenuItem::linktoRoute("Job Dashboard", 'fas fa-chart-bar', "etl_execution_dashboard");
yield MenuItem::linkToCrud('Etl Executions', 'fas fa-list', EtlExecution::class);
- Enable routes
etl_bundle:
  resource: '@Oliverde8PhpEtlEasyAdminBundle/Controller'
  type: annotation
  prefix: /admin
See the github repository for additional information.
Usage
Creating an ETL chain
To create an ETL chain in Symfony, you need to create a service that implements ChainDefinitionInterface.
The chain is built using typed PHP configuration objects.
1. Create a chain definition service:
<?php

namespace App\Etl\ChainDefinition;

use Oliverde8\Component\PhpEtl\ChainConfig;
use Oliverde8\PhpEtlBundle\Etl\ChainDefinitionInterface\ChainDefinitionInterface;
use Oliverde8\Component\PhpEtl\OperationConfig\Extract\CsvExtractConfig;
use Oliverde8\Component\PhpEtl\OperationConfig\Transformer\RuleTransformConfig;
use Oliverde8\Component\PhpEtl\OperationConfig\Loader\CsvFileWriterConfig;

class CustomerImportDefinition implements ChainDefinitionInterface
{
    public function getKey(): string
    {
        return 'customer-import';
    }

    public function build(): ChainConfig
    {
        return (new ChainConfig())
            ->addLink(new CsvExtractConfig())
            ->addLink((new RuleTransformConfig(false))
                ->addColumn('customer_id', [['get' => ['field' => 'ID']]])
                ->addColumn('full_name', [
                    ['implode' => [
                        'values' => [
                            [['get' => ['field' => 'FirstName']]],
                            [['get' => ['field' => 'LastName']]],
                        ],
                        'with' => ' ',
                    ]]
                ])
                ->addColumn('email', [['get' => ['field' => 'Email']]])
            )
            ->addLink(new CsvFileWriterConfig('output/customers.csv'));
    }
}
2. Register the service (if not using autoconfigure):
The interface has the #[AutoconfigureTag('etl.chain_definition')] attribute, so services implementing it are automatically tagged when autoconfigure is enabled (default in Symfony).
services:
    App\Etl\ChainDefinition\CustomerImportDefinition:
        tags: ['etl.chain_definition']
3. Configure maxAsynchronousItems and other chain settings:
class HighVolumeImportDefinition implements ChainDefinitionInterface
{
    public function getKey(): string
    {
        return 'high-volume-import';
    }

    public function build(): ChainConfig
    {
        // maxAsynchronousItems is set at construction: process up to 100 items in parallel
        return (new ChainConfig(maxAsynchronousItems: 100))
            ->addLink(new CsvExtractConfig())
            ->addLink((new RuleTransformConfig(false))
                ->addColumn('id', [['get' => ['field' => 'ID']]])
            )
            ->addLink(new CsvFileWriterConfig('output/processed.csv'));
    }
}
4. You can also inject dependencies into your chain definition:
class ApiImportDefinition implements ChainDefinitionInterface
{
    public function __construct(
        private string $apiUrl,
    ) {}

    public function getKey(): string
    {
        return 'api-import';
    }

    public function build(): ChainConfig
    {
        return (new ChainConfig())
            ->addLink(new SimpleHttpConfig(
                url: $this->apiUrl,
                method: 'GET',
                responseIsJson: true
            ))
            ->addLink(new LogConfig(
                message: 'Imported record',
                level: 'info'
            ))
            ->addLink(new CsvFileWriterConfig('output/api-data.csv'));
    }
}
Creating custom operations
Custom operations are automatically registered when they implement ConfigurableChainOperationInterface. The bundle’s compiler pass discovers them and sets up dependency injection automatically.
1. Create a config class:
<?php

namespace App\Etl\Config;

use Oliverde8\Component\PhpEtl\OperationConfig\OperationConfigInterface;

class CustomTransformConfig implements OperationConfigInterface
{
    public function __construct(
        public readonly string $targetField,
        public readonly string $transformation,
    ) {}
}
2. Create the operation:
<?php

namespace App\Etl\Operation;

use App\Etl\Config\CustomTransformConfig;
use Oliverde8\Component\PhpEtl\ChainOperation\ConfigurableChainOperationInterface;
use Oliverde8\Component\PhpEtl\ChainBuilderV2;
use Psr\Log\LoggerInterface;

class CustomTransformOperation implements ConfigurableChainOperationInterface
{
    public function __construct(
        private CustomTransformConfig $config,
        private ChainBuilderV2 $chainBuilder,
        private string $flavor,
        private LoggerInterface $logger, // Auto-injected by Symfony
    ) {}

    public function process(mixed $item, ?array &$output = null, mixed $context = null): void
    {
        $this->logger->info('Processing item', ['field' => $this->config->targetField]);

        // Your transformation logic here
        $item[$this->config->targetField] = strtoupper($item[$this->config->targetField] ?? '');

        $output[] = $item;
    }
}
The operation is automatically registered and all dependencies (except $config, $chainBuilder, and $flavor) are auto-injected using Symfony’s autowiring.
3. Use it in your chain:
class MyChainDefinition implements ChainDefinitionInterface
{
    public function getKey(): string
    {
        return 'my-custom-chain';
    }

    public function build(): ChainConfig
    {
        return (new ChainConfig())
            ->addLink(new CsvExtractConfig())
            ->addLink(new CustomTransformConfig('email', 'uppercase'))
            ->addLink(new CsvFileWriterConfig('output/transformed.csv'));
    }
}
How automatic dependency injection works:
The ChainBuilderV2Compiler compiler pass:
- Discovers all services implementing
ConfigurableChainOperationInterface - Identifies the config class from the constructor (must implement
OperationConfigInterface) - Resolves all constructor dependencies at compile time using Symfony’s dependency injection
- Creates a
GenericChainFactoryfor each operation with resolved dependencies - Automatically skips injection for
$config,$chainBuilder, and$flavor(handled by the factory)
Manual dependency injection:
If you need more control over dependency injection, you can configure arguments manually:
services:
    App\Etl\Operation\CustomTransformOperation:
        arguments:
            $logger: '@monolog.logger.etl'
Or use the #[Autowire] attribute in PHP 8.1+:
use Symfony\Component\DependencyInjection\Attribute\Autowire;

class CustomTransformOperation implements ConfigurableChainOperationInterface
{
    public function __construct(
        private CustomTransformConfig $config,
        private ChainBuilderV2 $chainBuilder,
        private string $flavor,
        #[Autowire(service: 'monolog.logger.etl')]
        private LoggerInterface $logger,
        #[Autowire('%app.etl.batch_size%')]
        private int $batchSize,
    ) {}
}
The compiler pass respects:
- Manually configured service arguments
#[Autowire]attributes on constructor parameters- Default parameter values
- Nullable parameters
Executing a chain
./bin/console etl:execute customer-import '[["test1"],["test2"]]' '{"opt1": "val1"}'
The first argument is the chain key (returned by getKey()).
The second argument is the input data, depending on your chain it can be empty or a JSON array.
The third argument contains parameters that will be available in the execution context.
Get a definition
./bin/console etl:get-definition customer-import
This displays the chain configuration and all its operations.
Get definition graph
./bin/console etl:definition:graph customer-import
This returns a Mermaid graph visualization of your ETL chain. Adding -u will return the URL to the Mermaid graph image.
Live execution graph
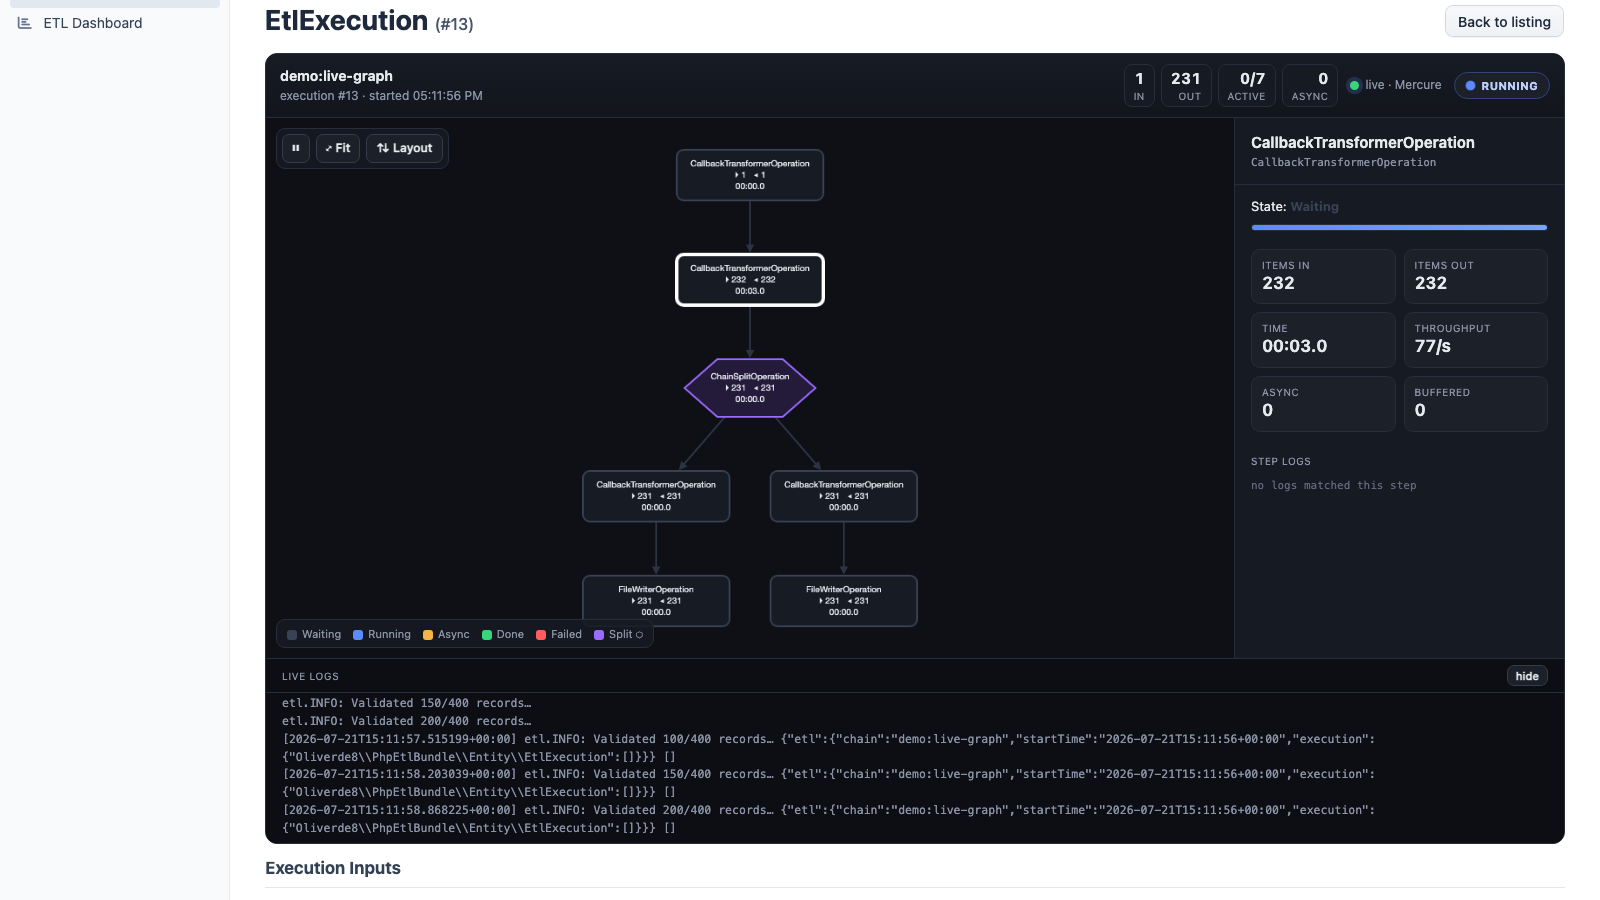
Once the EasyAdmin interface is wired in, every execution’s detail page shows its chain as a live graph: topology, per-step item counts, and a streaming log tail — updating in real time while the chain runs.
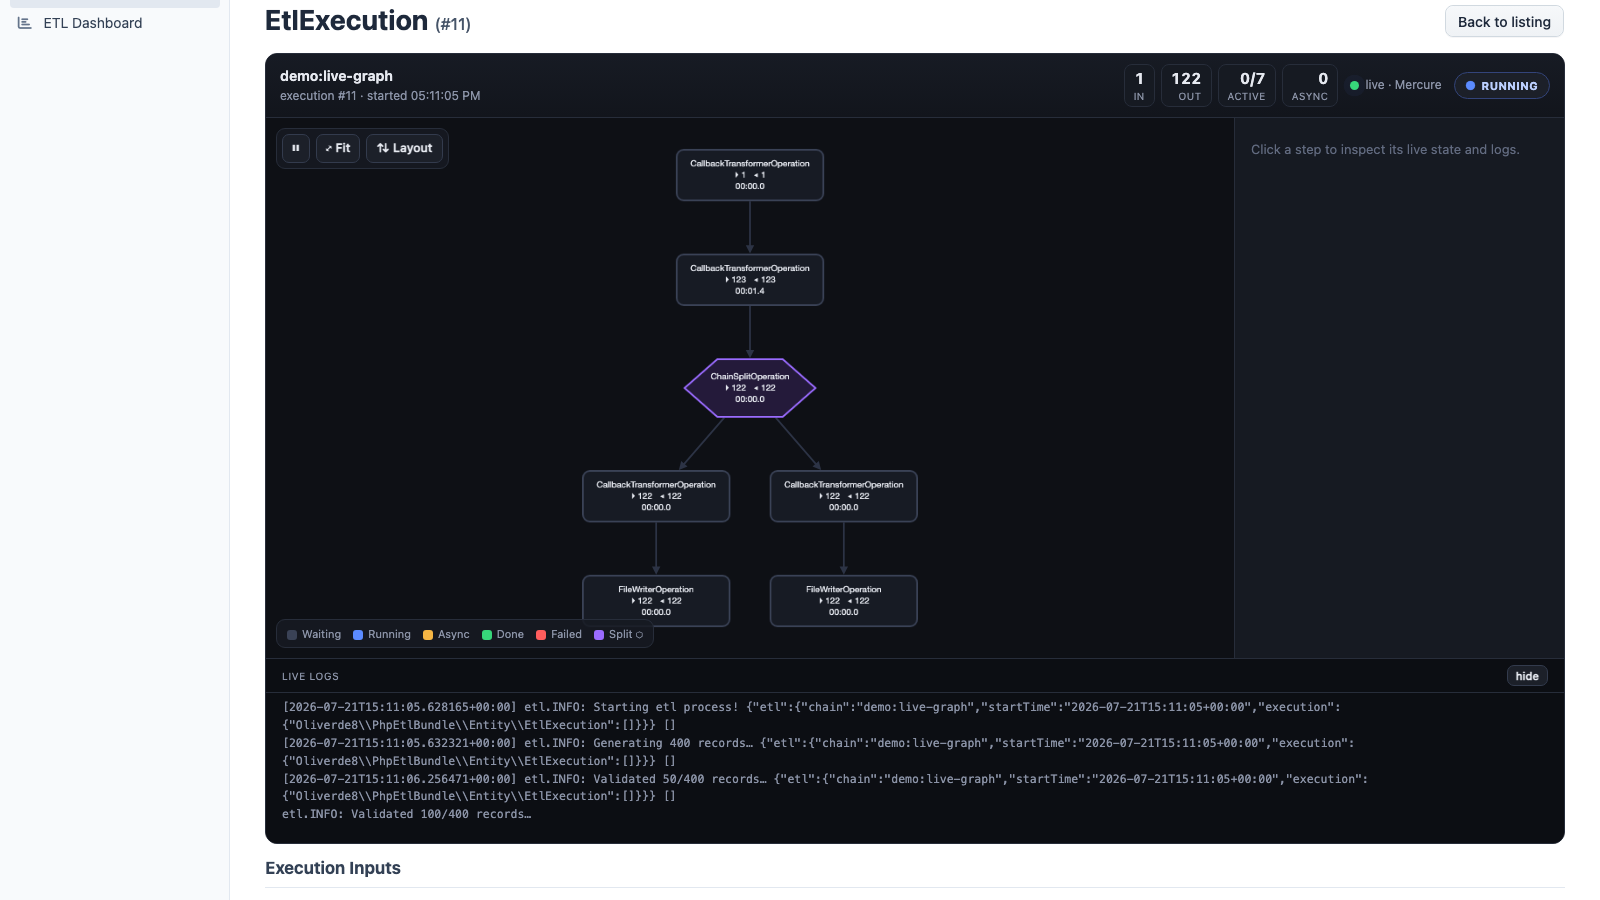
Click any step to inspect its live state: items in/out, time spent, throughput, and that step’s own log lines.
The graph degrades gracefully depending on what’s installed and how the execution runs:
| Setup | Behaviour |
|---|---|
symfony/mercure-bundle installed + hub configured, execution running async |
live push over Mercure (SSE) |
| execution running async, no Mercure | polls for state + logs every couple of seconds |
execution finished, or run synchronously (sync transport) |
fully static graph from the persisted result |
Install
Nothing beyond the EasyAdmin bundle above is required to see the static/polling graph. To get there and to light up real-time push:
-
Mount the bundle’s observability endpoints (topology, state and log JSON used by the widget) — put them behind your admin firewall, the same one that protects the EasyAdmin routes above:
# config/routes/oliverde8_etl_observability.yaml oliverde8_php_etl_observability: resource: '@Oliverde8PhpEtlBundle/Controller/' type: attribute prefix: /admin -
Route executions launched from the UI through the async transport, with a worker consuming it — without this, a chain runs synchronously in-request and the graph has nothing to stream (it just renders static once done):
framework:
  messenger:
    routing:
        'Oliverde8\PhpEtlBundle\Message\EtlExecutionMessage': async
php bin/console messenger:consume async -
Optional, for live push instead of polling: install
symfony/mercure-bundleand configure a hub:composer require symfony/mercure-bundle# config/packages/mercure.yaml mercure: hubs: default: url: '%env(default::MERCURE_URL)%' public_url: '%env(default::MERCURE_PUBLIC_URL)%' jwt: secret: '%env(MERCURE_JWT_SECRET)%' publish: '*'Point
MERCURE_URL/MERCURE_PUBLIC_URL/MERCURE_JWT_SECRETat any Mercure hub — the standalone Mercure.rocks Docker image, or the Caddy module bundled with FrankenPHP if that’s how you serve the app. The bundle detectssymfony/mercure-bundleautomatically and starts pushing; nothing else to configure. -
Publish the widget’s assets:
php bin/console assets:install public
A note on security
Every execution’s state and logs are published to Mercure as private topics, scoped to that one execution — the detail page mints a subscriber JWT (as a cookie) for the execution being viewed, so someone can’t just guess another execution’s topic and subscribe to its live logs by reaching the hub directly. You don’t need to configure any of this yourself.
What you do still need to configure: EtlExecutionVoter (the voter the bundle’s controllers check) ships as a
permissive stub that grants every attribute (view, queue, download, dashboard) to everyone. It’s meant to be
decorated with your own authorization logic. Until you do, the only thing standing between the outside world and
these executions — their data, logs, and downloadable output files — is your app’s firewall/access_control around
wherever you mounted the EasyAdmin and observability routes (/admin in the examples above). Make sure that’s a real,
authenticated firewall before deploying.